- Home
- FOR KIDS
Repurposing (or reinventing ) bottles is a blast, and bottle wrapping is an easy way to do it. Whether you’re going for a funky or elegant look, you can put your own spin on this project in no time. Here’s what you need to get started:
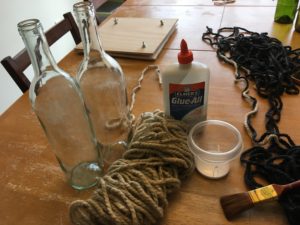
A bottle with the labels taken off
Glue (I use Elmer’s for household repairs/crafts – it dries clear)
A large paintbrush
Yarn
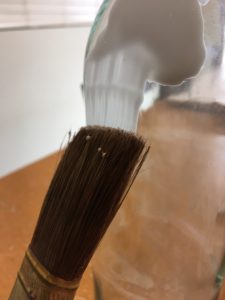
Glue It
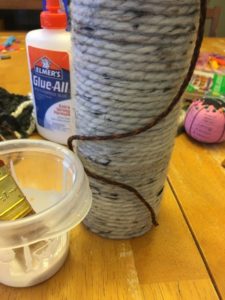
Start by painting glue all over the top of the bottle. Keep the bottom third of the bottle glue-free, so you can hold it without getting sticky when you start to wrap. Feel free to lay the glue on thick!
Wrap Your Bottle
Begin wrapping at the top of the bottle. If you put the end of the yarn down a bit and wrap the first loop on top so it overlaps, that will secure your start. Continue to wrap the yarn around the bottle. I found spinning the bottle slowly while holding my fingers in place worked well.
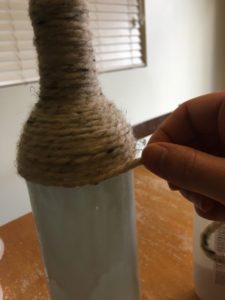
Once you get to the bottom of the bottle, add a nice thick layer of glue to keep it from unraveling – and then tip the bottle upside down to dry. Ta-da! You have a wrapped bottle! Now, how do you want to dress it up?
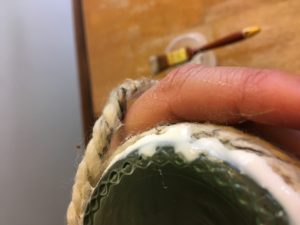
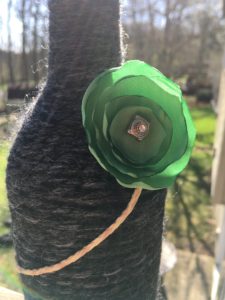
I used a braided strand of embroidery thread to create a “vine” for the flowers I wanted to put on my wrapped bottle art. To make the braid stick, I dipped it in glue, wiped off the excess, and stuck it onto the bottle. Because I used Elmer’s glue, I was confident the adhesive would dry clear (not trying to sound snobby here – I just haven’t had the same results with other glues.)
Dress Up Your Art
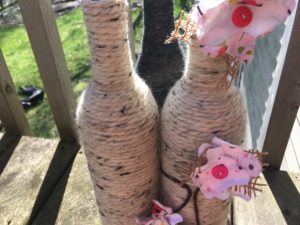
For a final touch, I added some of my funky fabric flowers to make this bottle an eye-catching work of art. If you’ve never made fabric flowers, they’re super-easy and fun! Check out my post from last week to get started. Happy wrapping!
Until next time,
Invent your story
Writing is a beautiful, solo act. It’s personal. Even if you’re writing in a room full of busy people, you can be alone with your paper, pen, and imagination. If someone looks over your shoulder, you can flip your book and politely change the subject.
I think it’s because of this design that writers tend to hold back from sharing their work with others. After all, it’s a self-fulfilling exercise, so what do others add to the process? Will sharing your writing with authors, editors, agents, and publishers throw your original work for a loop?
Well, it could. I know some writers who won’t share their work with anyone until it’s complete and revised multiple times. Other writers will collaborate on work at the brainstorming stage. I heard one author comment at a conference that she belongs to a writers group where no one shares what they’re working on. They just encourage each other to keep writing. So, there are many types out there.
The main reason most beginning writers hold back is fear. At least, that’s been my experience.
• Fear of judgement.
• Fear of rejection.
• Fear of crushing your creative spirit.
• Fear of others stealing your ideas.
• Fear of being misunderstood.
I can’t think of a reason for holding back that isn’t tagged with an element of fear. And it makes sense. The question is: does fear help or hamstring your writing?
I’m in a couple of writing groups. I’ve shared my work with fellow authors, editors, agents, and publishers via writing competitions. And you can imagine what happened:
- My writing was judged.
- It was rejected.
- My creative spirit was temporarily crushed
- I don’t think others have stolen my ideas, but trusted people know them.
- I’ve been misunderstood.
Phew! Got that out of the way! What else has happened?
- I’ve become a better writer.
- I’ve been encouraged to keep writing.
- I’ve shared laughs with people.
- I’ve shed tears with friends.
- I’ve taught my strengths to others.
- I’ve learned from others’ strengths.
- I’ve been thrust out of my comfort zone.
- I’ve read notes and revised.
- I’ve seen my work change in ways I cherish.
- I’ve attended writer’s conferences.
- I’ve shared session notes with friends when we couldn’t all be in one place at a time.
- I’ve helped others and edited their work.
- I’ve learned about the endless opportunities for writers.
- I’ve experienced a richness in my writing life that I wouldn’t trade for gold.
It’s smart to walk with discernment on your shoulder, but if you really want to fly as a writer, don’t go it alone. One of my favorite things to see on Twitter is the literary agents who are celebrating an author’s book. Or writers at a pitch party who spur each other on.
Sometimes I think of what the world would look like if others hadn’t faced the fear and rejection. From Einstein to Dr. Seuss, inventive individuals looked at their wings and decided the sky was the only thing they could be made for. Are you ready to join the flock?
Until next time,
Invent your story
Do you ever just pull out the craft box and see what happens? This week, my kids made a significant improvement to the old toilet-paper-binocular design. And I learned a valuable lesson from them.
The way I learned to DIY play binoculars was to tape a couple of toilet paper rolls together, and boom! Your explorer has a pair of binoculars that they can play with. I don’t know who came up with it, but probably some pretty crafty adult who loves kids. Arguably, someone like me.
This week, while I was making foolproof fabric flowers, my kids tore into the craft box. It was interesting to hear their ideas unfolding, but I was working on my own thing so I didn’t get the gritty details. But afterward, this beauty emerged.
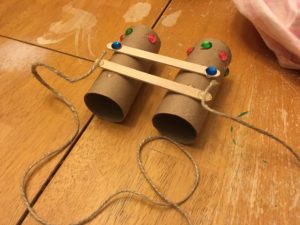
“You know how binoculars don’t fit your face right? We fixed that problem with these popsicle sticks!”
By adding popsicle sticks, a bridge was created between the rolls. You can now customize the binoculars for the individual who will be using them. Instead of struggling to see inside, this fancy new feature improves the viewer’s experience and play time.
Here’s the one sentence how-to on this project: take two toilet paper rolls, glue popsicle sticks on top to adjust the width, attach string for easy carrying, and color/design to taste.
Why make a blog post out of something you can say in a sentence?
Innovation
Yesterday, I visited a dear friend recovering from an intense knee surgery. As we talked, her leg was elevated on the couch, encased in a black strapped cast, and hooked up to a coolant machine. Instead of an ice pack, ice water in the cooler was piped through water lines and circulated through a plastic/fabric pad that wrapped around her knee.
It was a lot nicer than the bag of ice we used to use. I wonder who looked at the old bag of ice and said, “we can do this better.” When did they start thinking that way?
Here’s the point: when you let your kids loose on the craft box, you give them the opportunity to think innovatively about what they’re doing. As they dream up what they want to make and start to design it, they will see problems and come up with solutions. Their inventive side will be unleashed.
Sometimes we adults want to run the show instead of enjoy the show. We put pressure on ourselves to have the answers, share the answers, and make sure the kids in our care remember the answers. There’s a wonderful place for Q & A. But…
Every so often, if not every day, just open the craft box and see what comes to life. It just might surprise you. And the lessons learned by doing may be the greatest ones of all.
Until next time,
Invent your story
Fabrics are fantastic. I’m a fan, if not a fanatic. I’m not an expert in textiles, but the beautiful thing about today’s trick is a sewing novice can fabricate flowers. All you need is an imagination and a few tools.
When you start working with different fabric textures and types, you soon discover how shifty and slippery they can be. In this tutorial, I am going to teach you a fool-proof way to have fun with your scraps. I used an old bridesmaid dress that was altered.
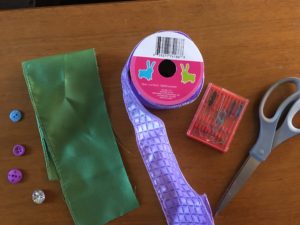
You’ll want to grab:
A needle and thread
Scraps of fabric or ribbon (I used polyester)
Scissors
A button or bead (optional)
Make Imperfect Cuts
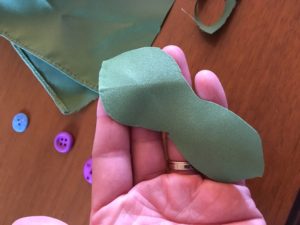
Decide the shape and size of leaf or petal you want to make, and start cutting. It doesn’t have to be perfect! I follow this rule of thumb with my fabric flowers: plan a design and don’t sweat the little shifts. It’s all part of the art! You can fold the fabric in half to create a more symmetrical shape if you want.
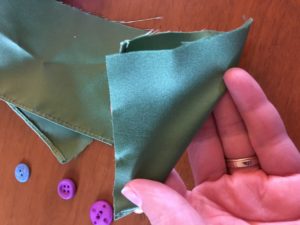
Fold for Textures
The fun thing about working with fabric is you literally can build textures into the piece. When you hold a shape in your hand, it looks flat and lifeless. Give it a fold or two, and suddenly a leaf emerges. Isn’t that amazing?
Layer for Depth
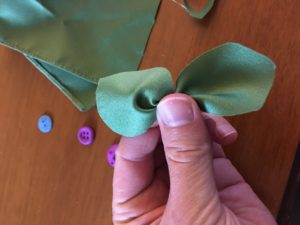
No flower has one petal. Add depth and whimsy to your flowers by giving them at least three layers. I gave mine three and plan to do four for my next flower. You’ll be able to gauge what’s best by playing around with your pieces.
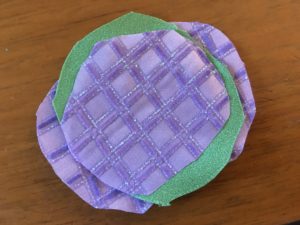
Add the Center
The center of your flower can be a contrasting or coordinating color. You can use a bead, a button, or even create an X with the thread by repeatedly sewing through the center. You’ll want to make at least four stitches to secure it. After tying a knot in the back, your flower is complete.
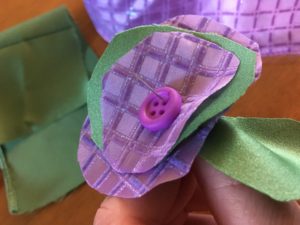
Unless…
Beauty after Burning
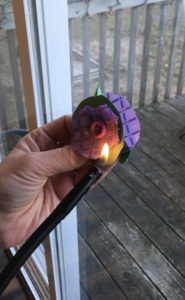
Some fabrics (like polyester) actually melt when you draw a flame close to them. This seals the frayed edges and creates that ridged effect. Detailing your fabric flowers this way adds pizazz to your fantastic fabric garden.
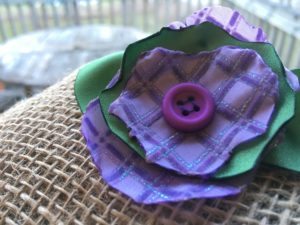
Thank you for journeying through the fabric fields with me today. Happy flower-making, and happy spring! I’m so glad all inventions aren’t made of steel and fiberglass. Some just make me smile. If you liked this adventure, check out watercolor art for more artistic fun.
Until next time,
Invent your story
Writing a rough draft is exhilarating. Most of the time. That new idea bubbles up in my mind, tingles my fingertips, and makes me sit my busy butt down long enough to put it on paper. It’s my happy place. However, editing is an entirely different animal.
Editing is like unleashing my inner pack on my writing. I don’t know if everyone has a crowd of canines that crashes into their thoughts, but if you don’t, I’d love to introduce you to some of mine. They’re extremely friendly and helpful. Most of the time.
The Bloodhound: This editor sniffs out each nook and cranny from sentence structure to syllable count. She snarls at spelling mistakes. She barks, “You just wrote two sentence fragments instead of complete sentences. You’re breaking the rules.” Bloodhounds are very useful, and I love them, but sometimes I have to call her off the scent. Once in awhile, it’s okay to break the rules.
The Yippy Cocker: Not all cocker spaniels are yippy dogs, but this one is. She yaps, “It’s too short!” “It’s too long!” “Use better language!” “That’s not right!” “That’s not right either!” “Don’t erase it!” No wonder she always need to pee. If I can calm the hyper, this puppy’s really useful. I just don’t let the little dog run my show.
The Shaggletooth Monster: He’s the dog featured in this post. He’s a mutt. He has no pedigree, and loves everything. He doesn’t bark, yip, growl, or bay – he licks. He will lick the wall, the floor, the couch, the toys, the paper plates…and I forgot he’s supposed to be in my head.
This editor never stops trying to get that last crumb off the page. The truest dog on a bone, he will keep at a piece of work until he’s accidently shredded and destroyed it. So, I love this guy, but at some point I have to pull that drool-soaked manuscript out of his mouth and say, “Okay. Let’s hand this off to someone else.”
If you don’t have a pack of pups on your writing team, I think it’s worth your time to sit down and discover how you think about what you write. Not only is this exercise useful, it can be a lot of fun. I want close with, “Trying it will make you want to howl!” But my team is good at holding me at bay. Most of the time.
Until next time,
Invent your story
Do you have a shop on Spreadshirt? If you’re an artist of any kind, it’s hard to find a reason not to have a Spreadshirt Shop. Last month, I opened my shop and I’ve found the company is:
- A Great Outlet for Your Creative Work
You know when you think of that “thing” or have that “wacky idea” that belongs on a T-shirt? Now you can put it there and let others laugh/cry/snicker/sigh along with you. It’s a cool way to share your thoughts, ideas, and values with the world.
- Win-Win Solution Mentality
Spreadshirt provides eco-friendly shirts, mugs, and paraphernalia – plus payment processing, web space for your shop, and a 30-day money back guarantee for your customers. They take care of the business side of things, and they do it responsibly. That helps their artists be free to focus on design and do what they do best.
- Free Shop Setup and Maintenance
Because we’re partners, they welcome quality designers and provide the space to host your shop absolutely free. You can immediately have two avenues for sale: your own shop and their marketplace. Each has different advantages, but either way, you’re set up for success a.s.a.p.
- Commissions are Commendable and Reward Growth
As an artist, you will receive a commission for your work. That commission bumps up when you make a certain number of sales per month. In this way, Spreadshirt recognizes and rewards hard work and artistic talent.
- Getting Started is Easy
Setting up shop is a piece of cake. You have a reasonable amount of control over where the design is placed and the size of the design. I carefully examine each of my designs and how they appear on every item to make sure my customers get their best look.
- Spreadshirt Cares about Quality
In addition to being eco-friendly, each design goes through an approval process before it’s displayed for sale. Don’t let that turn you off if you like to push the envelope – they print some really edgy stuff – but they won’t print anythingthat’s sent their way without question. I respect them for that.
- Growing in their Market
I read their blog this week, and Spreadshirt is listening to their artists and expanding their market. Next week, posters will be available for sale through Spreadshirt, and I’m excited for the potential that comes with this new outlet for creativity. When I made my “Think Spring” design, my husband thought it would make a great poster. Now, we have that opportunity!
If this post has inspired you to start your own shop on Spreadshirt, let me know! When your shop is setup, leave a link to it in the comments below! I would love to check out (and quite possibly purchase) your art, my fellow inventor. 🙂
For easy access, you can go to Spreadshirt now to get started.
Until next time,
Invent your story
Disclosure: Because I love the opportunities that are offered through their company, I’ve joined Spreadshirt’s affiliate program. This gives me an opportunity to receive a commission if someone signs up through my site. Have fun creating!
Amazing Agricultural Chemist and Inventor George Washington Carver
- Janelle
- - Apr 12, 2018
- 3653 Views
- 0
George Washington Carver’s story is nothing short of incredible. He was an African American born into slavery. He was kidnapped and recovered as an infant. At the end of the Civil War, he was freed, and George left home shortly after to pursue education. That’s just the beginning.
Carver faced rejection from schools because of his ethnicity, but he persevered through every trial as he pursued his interest in plants and agriculture. George excelled at his studies, earning a bachelor’s and master’s degree from Iowa State University. A lover of the arts, he also studied painting and piano. After graduation, he taught at the Tuskegee Normal and Industrial Institute and directed their department of agriculture.
He’s best known for his groundbreaking work with southern farmers to plant peanuts and soybeans in lieu of the cotton plants. George was a Christian and gave credit to divine inspiration for his methods in addition to his study and work. Much more than a peanut man, Carver worked with sweet potatoes and saw potential in every plant. The cotton plants and southern economy were in critical condition from the boll weevil and poor soil conditions, and George put his new ideas to work.
The peanut wasn’t even seen as a crop when George W. Carver came to Tuskegee in 1896. After six years of implementing his ideas, the land experienced a huge turnaround and the economy flourished. His breakthroughs changed the agricultural world forever.
Carver received the honor of being elected into Britain’s Society for the Encouragement of Arts, Manufactures, and Commerce. Presidents Calvin Coolidge and Franklin D Roosevelt came to see him, and he was offered a job by our inventor Thomas Edison to work with him for more than $100,000 a year. Carver declined. He established the Carver Research Foundation at Tuskegee to propel agricultural research and was sought for his expertise by many world leaders.
I think one of the greatest things we can learn from George Washington Carver is not to let anything keep you from doing what you have a heart for. There were people who opposed Carver for terrible reasons, and the entire world would have suffered if he’d chosen to succumb to his oppressors. His intellect, work ethic, faith, bravery, and respect for the arts as well as science are inspiring.
What do you have a heart for, my fellow inventors?
Until next time,
Invent your story
(Sources include but not limited to britannica.com, biography.com)
Adding pen and ink to your watercolor painting can really make your picture pop. I tried my first watercolor painting this year, and I immediately wanted to share what I learned with the kids. Although this art form is sophisticated (much more sophisticated than me!) it’s accessible to kids of all ages with supervision.
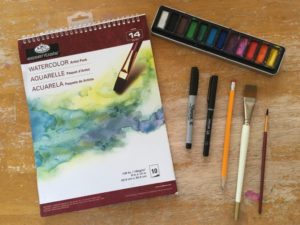
What you need:
- A big brush and a little brush
- A cup of water
- Watercolor paper
- Watercolor paints (we used a palette-style)
- An ultra-thin Sharpie marker
- A .05 micron (or comparable) pen for finer lines
- A pencil
The first think you do is choose your design. You can freehand a picture with a pencil (like we did in the featured image) or you can trace a design onto your watercolor paper.
Next, wet your paper with the big brush and begin to add the colors you want on your background. Try to keep the background water and paint separate from the area of your design. This will prevent unwanted color blending.
After your background looks the way you want it to, it’s time to use your little to color the details of your design. This can be as precise as you like. Less water produces a brighter color, and more water makes the colors soft/light.
Finally, when your painting is dry, you can color over your original pencil lines with the Sharpie marker or ink pen. You may decide to add more detailed lines that your original drawing didn’t include. Art has a way of taking on a life of its own, so enjoy the process and have fun.
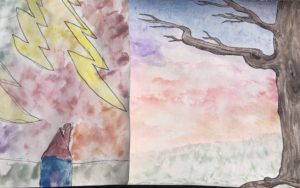
I loved doing this project with my kids, because it introduced them to mixed media art. It was also a relaxing activity at the end of the day. I hope the children in your life enjoy it too!
Until next time,
Invent your story
I started the year off with a post about choosing a New Year’s word instead of resolution. The word I chose was try. This three-letter word completely changed my life.
Things I have tried for the first time since January 2018 (it is now April)
- Skateboarding on a longboard.
- Inviting a guest writer to IYS.
- Painting with watercolors/pen & ink.
- Opening an online shop.
- Copyrighting my work.
- Writing a negative space story.
- Entering the PB Party competition on Twitter.
- Rollerblading backwards as fast as I can.
I’ve tried other things as well, but these are the stars of the day. As I’ve learned about my new word-friend try, I’ve discovered there are a lot of misconceptions about it. You’ve probably heard this one:
If at first you don’t succeed, try, try again.
Nope. Not always the case. There are some things you just don’t need to be that successful at. Like skateboarding. I tried it. I liked it. I fell and couldn’t move my arm for a few days without pain. I’d change this friendly saying to: “If at first you don’t succeed, try and re-evaluate.” Don’t quit, but don’t be afraid to do things different next time.
You won’t know if you never try.
There are things you can know without trying them. Drugs are a good example. Don’t try drugs. They’re bad. You don’t need to try them to know. For most good things, this is a fair but incomplete saying. The most important thing you need to know about try is this:
Try is both a teacher and a trickster.
You learn a lot of things by trying. You learn about your strengths and weaknesses. You get firsthand experience, and what you learn will stick better. Yes, trying is a good teacher – except that you can “learn” things that can feel true but aren’t true.
If you try something new and it doesn’t go how you planned, you may be hasty to draw concrete solutions. Because hitting concrete hurts. Try can seem to trip you and then laugh at you when you’ve fallen on your face. This is the trickster side of try – and the point where some people don’t want to be friends anymore with this three-letter word.
When that happens:
Get up, and let yourself laugh for a minute with try. Don’t abandon try, but instead, lead this little word in your life. I will skateboard again – probably with elbow pads. But most of my time will be spent trying (and re-trying differently) things that I have a passion for and love.
Of all the new things I tried this year, rollerblading backwards came the most easily to me. It was fun! I was glad I tried it, but just because it came naturally to me doesn’t mean it was deeply fulfilling. I’ll do it again, but I’ll spend most of my time trying things that challenge me in other ways.
So, for my first-quarter evaluation of try, I would say we’re going to be life-long friends.
Did you pick a New Year’s word? How is it going so far? If you didn’t, there’s still a lot of time left. Leave your word in the comments, so we can journey together! Success is not guaranteed, but interesting is!
Until next time,
Invent your story.
Refreshingly honest. Dedicated to the writing craft. A talented, down-to-earth author, meet our guest post writer: Amos Dyer. Amos reveals where bone and marrow meet in his writing today. I follow Amos’s blog, and you can benefit from his insights at amosdyerauthor@blogspot.com. Amos writes:
There are two things you will require before going any further: Perseverance and Resilience.
If we are to believe what Mark Twain once said, “There is no such thing as a new idea” then why write at all? When we put Twain’s words into the perspective of an entire world of stories – hundreds of cultures spanning hundreds of years – it’s easy to accept the idea that maybe our story has been told before.
This is a question (doubt demon, writing gremlin, plot-line obstacle, etc.) that I suspect everyone who has ever dreamt of becoming a writer has asked themselves at some point along their journey. But, as with every protagonist we write, we must persevere through this conflict. I personally take comfort in the understanding that while my story may not be new, it is still unique; because the way I tell the story is different from the way anyone else would tell it. If this perspective works for you as well that’s great; or you have a talisman of your own that wards off this doubt that works, that’s great as well. Either way, persevere and write your story, because it only gets worse from here.
Since there are no new ideas – I can imagine some agent or editor, holding the fate of our writing future (some call this a manuscript) in their hands. And, as they gauge the worthiness of our work, I can also imagine at least one of them has a print of the old adage “Don’t reinvent the wheel” pinned to their cubical wall. It serves as a reminder to always watch out for the unimaginative spin on the tale that has been told a thousand times. It is the same concept that drives them to keep a template rejection letter on their desktop, to which they can quickly copy and paste your name into and send off. Why create a whole new document? Why reinvent the wheel? To which I respond: If someone didn’t reinvent the wheel at some point, we would still have wagon wheels on racecars.
Rejection is another obstacle we face. Whether active, in the form of rejection letters, or passive in the form of no response at all; it is an obstacle which perseverance alone is not enough to overcome. We must be resilient. We must face of this adversary and accept the truth that while our story may not be new, it might still be relevant to the world today. This resilience takes form every time we resubmit our work to a new agent and every time we start a new manuscript.
Sure, we might be reinventing the wheel. Yes, we might be telling the same old story. But through perseverance and resilience, we might just tell it in a better way
