
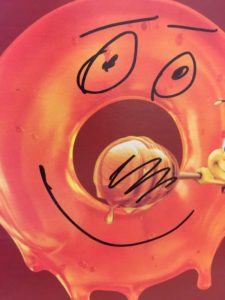
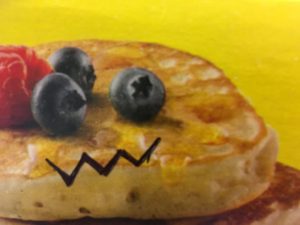
I can’t take credit for the cool faces on all of these boxes. I have an artist in my home who learned this technique from a buddy. Since my son took it up, our home has exploded with fun faces that bust up the doldrums of household routines.
Just for giggles, here’s my how-to tutorial for Cereal Box Sharpie Art:
1.) Choose a cereal (or other) box.
2.) Grab a sharpie.
3.) Get creative.
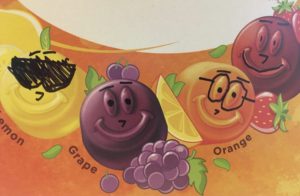
How long has it been since you’ve given yourself complete creative freedom? When was the last time you recklessly abandoned the rules and thought, “What else could this be?” The ingenuity of this art form is its out-of-the-box thinking. Sorry guys, it just had to be punned.
Just in case you think I’m off my rocker, I’ll let you in on a little secret: I’m not a super-great artist. I love art, and I marvel at the classic, great artists who’ve earned every bit of their fame. But I am not, and will never be, one of those men or women.
I’m more of an “art-inspires-me-so-I-create” kind of artist. A lot of my work is just odd. I like it that way. But why in the world do I put it online for you to see and try for yourself?
Here’s the thing: I don’t care what category your profession falls under – healthcare, hospitality, computer software development, or waste management – every job needs innovative thinking. Are faces on cereal boxes innovative? Maybe, but they definitely shake things up, and they’re reminders.
Reminders that things can change.
So, if you’re stuck in any way, shape, or form in life, grab a sharpie and a box. Change it up! Remind yourself that even good things can be a little brighter when you add your creative thinking to them.
Until next time,
Invent your story
This seems like the easy part of creating an invention center – you just get the supplies you need. The thing is, without a method to the madness, it’s just madness. So here are three plumb line questions to keep you stockpiling instead of just making piles.
Does the material fit into the goal of your invention center?
I know I haven’t brought up the term “goal” in the context of your invention center before, but if you’ve come this far, you probably have a good idea of what yours is already. (If you haven’t read the first two posts on creating an invention center, you can read what it is and Part 1 to get caught up.) If you’re woodworking, you’ll need wood, screws, a drill, etc.
This is the no-brainer stuff to have around. Without a stocked area, you’ll get bogged down looking for that lost paintbrush or copper wire. This is why we’re making an invention center.
How much do you need to get started?
Sometimes the zeal to create can take over, and you end up with a lot more than you need – especially if it’s freebie stock. Like toilet paper rolls. There are tons of art and engineering projects you can do with toilet paper rolls. But if you keep saving and don’t use them, well it can just start to get weird.
There has to be a FULL point. Then move on.
Did you throw a wrench in your plan?
If the answer to the last question is “nope” – then it’s time to find that wrench and throw it into the stockpile! Hear me out on this one. If you want to create a maker’s space, that’s great, but this is a defining moment for your invention center. You want to have something in your invention center that challenges you to break the mold. More than something. A fair lot of things. An acorn from last fall’s hike. A bunch of rusty nails. One red sock.
These are the grains of sand that help your creative oyster make a pearl.
Until next time,
Invent your story
In my previous post, I promised to keep you updated on my invention center. Here’s my update: progress was slow. Why? I thought a lot about how to move forward with the space I have. Maybe I’ve been overthinking it. So, without further ado, here’s…
Tip #1.
Don’t Overthink It
Underthinking things in life (Can I afford this? Should I jump?) can get you into trouble. But overthinking is its own beast. Analysis paralysis is a real thing, so if you keep coming back to a space you have to work with and thinking, “That’s probably the best place to start…” it probably is.
That said, here are four more things to consider before making that final decision:
Tip #2.
Consider the Nature of the Work
If it’s electronics, you’re going to want a table and a nearby outlet. If it’s painting, an easel may be your best option. You also will want to consider the kind of floor you’re on. I want to do a little bit of everything and not destroy anything, so I went for a corner of our basement where the floor is painted concrete and an outlet is nearby.
Tip #3.
Remember Ventilation and Safety
Everything we do involves a level of risk, so it’s smart to assess yours and take precautions. If you’re going to be working with chemicals (paint thinners, glues, stains, etc.) that give off fumes, be sure your workspace has a window you can open when needed. Having a nearby water supply is helpful. Take the time to map out an emergency plan, so you are well prepared.
Tip #4.
Lighting Effects Work
When I was a kid doing homework at the kitchen table, my mom would walk by and flip on the overhead light for me. “It’s better for your eyes,” she’d say. Mom was right. Does your space have natural or overhead lighting? Would a small lamp be beneficial for you, and if so, where will that fit into things? It’s worth considering as you move forward with your new venture.
Tip #5.
Give Yourself Room to Grow
Starting small is starting smart, but don’t limit yourself or your imagination. Right now, my invention center is a table in the corner of the basement. Maybe one day it will be a super-techy-inspiring-for-inventors-everywhere place, but today, it’s a simple table with room to grow. And that, my friends, is not a bad beginning.
Until next time,
Invent your story
Adding pen and ink to your watercolor painting can really make your picture pop. I tried my first watercolor painting this year, and I immediately wanted to share what I learned with the kids. Although this art form is sophisticated (much more sophisticated than me!) it’s accessible to kids of all ages with supervision.
What you need:
- A big brush and a little brush
- A cup of water
- Watercolor paper
- Watercolor paints (we used a palette-style)
- An ultra-thin Sharpie marker
- A .05 micron (or comparable) pen for finer lines
- A pencil

The first think you do is choose your design. You can freehand a picture with a pencil (like we did in the featured image) or you can trace a design onto your watercolor paper.
Next, wet your paper with the big brush and begin to add the colors you want on your background. Try to keep the background water and paint separate from the area of your design. This will prevent unwanted color blending.
After your background looks the way you want it to, it’s time to use your little to color the details of your design. This can be as precise as you like. Less water produces a brighter color, and more water makes the colors soft/light.
Finally, when your painting is dry, you can color over your original pencil lines with the Sharpie marker or ink pen. You may decide to add more detailed lines that your original drawing didn’t include. Art has a way of taking on a life of its own, so enjoy the process and have fun.

I loved doing this project with my kids, because it introduced them to mixed media art. It was also a relaxing activity at the end of the day. I hope the children in your life enjoy it too!
Until next time,
Invent your story
I did not come up with this idea, but I’ve seen tutorials and was curious if this odd little trick really worked. It does! If you have nail polish around the house that you want to get rid of, this is a great way to put it to use. Here’s how it works:

Supplies You Need:
Bowl
Stirring tool (I used a straw)
Nail Polish
Water
Object (white or clear works well) to design
Fill it!
Fill the bowl about halfway with water. You want it deep enough so there’s some distance between the surface of the water and the bottom of the bowl, so you don’t bump it. You can adjust this to your liking.

Mix it!
Take your favorite colors, and experiment. You can use as many as you want, although following a color scheme is usually a good idea. The nail polish will float on the surface of the water, and when you have the colors you want inside, go ahead and give it a stir.

Dip it!
Now’s the fun part. Gently dip and turn your object onto the surface of the water. The nail polish will adhere to it right away! I found that all of the bowl was not covered to my liking with my first turn, so I simply put more nail polish in and did it again!

The project can get a little bit stinky and messy, but the results are fantastic. Plus, it’s a cinch to set up. This little bit of inventiveness is the perfect way to add a splash of color to your life.

Happy Inventing!
Games are a great way to build skills while having fun. So this St. Patrick’s day, grab a few tools that will get those kids thinking. This project has some unusual pieces, but is easily modified, so if you don’t have it at home, try something comparable.

Here’s the basics of what you need:
A cup (for the goal)
Some lightweight balls (to shoot at the goal)
A jumbo popsicle stick (for shooting)
A spring (for resistance)
A paint stick (for the base)
Duct tape (for the hinge)
Decorative stuff – paint, sequins, pipe cleaners, etc. (for fun)
Hot glue
Start by lining the end of the paint stick up with the end of the jumbo popsicle stick. Add a piece of duct tape over the top edge of the sticks so they can open and close freely. This is your hinge.

Wrap the excess duct tape around the sides of the hinge. Secure it with a second piece of duct tape on the un-taped side, and wrap in the same fashion as the first piece. You now have a hinge!

If you press the two sticks together, you will feel a level of resistance, but it’s not enough act as a shooter. Put the spring in between the two sticks, and you will begin to get a feel for where it fits best on the base.

Once you’ve found the sweet spot where it will launch you ball, use hot glue to secure the spring to the base. Do not glue the spring to the popsicle stick! You will need the full motion of the top stick to launch the ball into the air.

When the glue is cool, it’s time to decorate. Your game is ready! There are many ways to play, but for St. Patrick’s Day, why not pretend that you’re a leprechaun and you’re saving up treasure in your pot of gold. The person who gets the most of their color in the cup wins the pot!

Happy St. Patrick’s Day!